さくら VPS Python Selenium Web 自動操作
さくら VPS Ubuntu リモ-トディスクトップ機能
さくら VPS Ubuntu リモ-トディスクトップ機能を入れていきます。
必須ではありません。
おまけです。
PC と Ubuntu ディスクトップとの間でコピぺができるようになるので便利です。
Ubuntu20.04 でリモートデスクトップ
が参考になりました。
ubuntu-desktop をインスト-ルします。
シリアルコンソ-ル(β版)を開き、
yamada@********:~$ sudo apt update
これをあらかじめやらないとエラが出ます。
yamada@********:~$ sudo apt install xrdp
インストールの途中に入れますか?と聞かれますので
y を押してください。
これでリモ-トデスクトップ環境が入ります。
XRDP を起動します。
どのユ-ザを起動するか聞かれますので、今回は
yamada を起動します。
  yamada@********:~$ systemctl start xrdp

  ==== AUTHENTICATING FOR org.freedesktop.systemd1.manage-units ===
  Authentication is required to start 'xrdp.service'.
  Multiple identities can be used for authentication:
   1.  ******
   2.  yamada
  Choose identity to authenticate as (1-2): 2
  Password:
  ==== AUTHENTICATION COMPLETE ===
次に Ubuntu の再起動時に xrdp を自動起動する設定もいれます。
何回かどのユ-ザに適用するか聞かれますので今回は yamada を選択します。
  yamada@********:~$ systemctl enable xrdp

  Synchronizing state of xrdp.service with SysV service script with /lib/systemd/systemd-sysv-install.
  Executing: /lib/systemd/systemd-sysv-install enable xrdp
  ==== AUTHENTICATING FOR org.freedesktop.systemd1.reload-daemon ===
  Authentication is required to reload the systemd state.
  Multiple identities can be used for authentication:
   1. ******
   2. yamada
  Choose identity to authenticate as (1-2): 2
  Password:
  ==== AUTHENTICATION COMPLETE ===
  ==== AUTHENTICATING FOR org.freedesktop.systemd1.reload-daemon ===
  Authentication is required to reload the systemd state.
  Multiple identities can be used for authentication:
   1.  ******
   2.  yamada
  Choose identity to authenticate as (1-2): 2
  Password:
  ==== AUTHENTICATION COMPLETE ===
  ==== AUTHENTICATING FOR org.freedesktop.systemd1.manage-unit-files ===
  Authentication is required to manage system service or unit files.
  Multiple identities can be used for authentication:
   1.  ******
   2.  yamada
  Choose identity to authenticate as (1-2): 2
  Password:
  ==== AUTHENTICATION COMPLETE ===
  ==== AUTHENTICATING FOR org.freedesktop.systemd1.reload-daemon ===
  Authentication is required to reload the systemd state.
  Multiple identities can be used for authentication:
   1.  ******
   2.  yamada
  Choose identity to authenticate as (1-2): 2
  Password:
  ==== AUTHENTICATION COMPLETE ===
XRDP 接続ポート変更
RDP のデフォルトポート「3389」は、インターネット上に公開すると攻撃を受けます。
半日もすれば、確実に攻めてきます。
なので、必ずポートの変更をします。
Windows10からのRDP接続(ubuntu20.04 LTS)
が参考になりました。
ポートを 3389 から別のポートに変更します。
yamada@********:~$ sudo nano /etc/xrdp/xrdp.ini ・・・・・・・・・ ; ports to listen on, number alone means listen on all interfaces ; 0.0.0.0 or :: if ipv6 is configured ; space between multiple occurrences ; ; Examples: ; port=3389 ; port=unix://./tmp/xrdp.socket ; port=tcp://.:3389 127.0.0.1:3389 ; port=tcp://:3389 *:3389 ; port=tcp://:3389 192.168.1.1:3389 ; port=tcp6://.:3389 ::1:3389 ; port=tcp6://:3389 *:3389 ; port=tcp6://{ }:3389 {FC00:0:0:0:0:0:0:1}:3389 ; port=vsock:// : port=3389 ← ここの数値を任意のポートに変更[例 13389] ; 'port' above should be connected to with vsock instead of tcp ; use this only with number alone in port above ; prefer use vsock:// : above use_vsock=false ; regulate if the listening socket use socket option tcp_nodelay ; no buffering will be performed in the TCP stack ・・・・・・・・・
xrdp を再起動します。
service xrdp restart
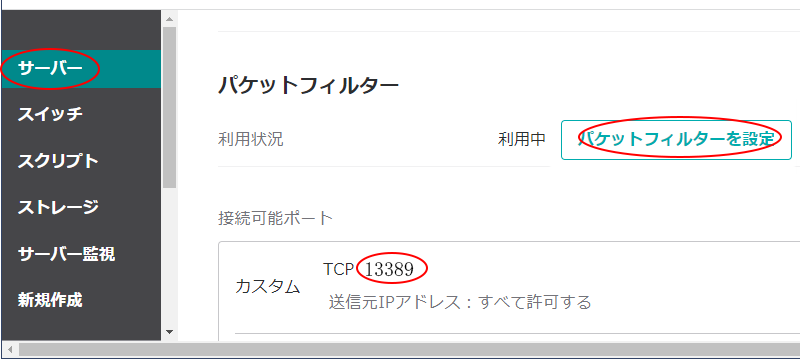
パケットフィルタ設定
通常さくら VPS を利用される方は、パケットフィルター機能を使用されているかと思います。
本機能を使用されている方は
パケットフィルター
を参照して忘れずに、変更したポート番号[例 13389]を開放してください。

ここまでで、サ-バ側の設定が完了しました。
引き続き、WindowsPC 側の設定を行なっていきます。